
This guide will attempt to clarify the seemingly mysterious methods, rules, and design techniques one should take into account when attempting to create a competitive level. Specifically, the guide will focus on the aspects of mapping for the Challenge ProMode mod for Quake III Arena. I know, you're probably wondering why you would need this guide when you've already got all those other great articles around. But this particular guide will be a sort of culmination of previous knowledge–taking in all past information and conglomerating it into one single comprehensive article. Hopefully this will make it much easier for the beginning mapper to create quality competitive maps without having to take ages to learn all the aspects of creating them. The guide is to be used as a sort of reference book. Although reading it one time through is okay, it is best to treat it as if it were a kind of manual. You don't usually read manuals straight through, but instead keep them handy for looking up various things at different times.
This guide is for anyone who has ever thought about, is presently considering, or is thinking about creating a serious playing tourney map for Quake3. While not a guarantee, the guide will set you in the right step forward to get your maps play time on actual servers. Even if you are just wanting to create a fun non-competitive tourney map, the guide will still be of use.
Before I get started I would just like to thank all of the guys over at the Promode Forums for putting up with all the testing of my maps and for actually showing me most of this stuff. Also a big thanks goes to Hoony for getting me set up here and allowing me to post the map up on Promode.
First of all, there are already some very informative articles out there which have a great deal of useful information in them. Much of what this guide says is simply shadowing what some of these articles have already said.
Before you even start your map, you should decide exactly what you are wanting to do with the map. This is A Good Thing(tm) to do for any map you do, not just tourney. So you need to decide if you really want to do a competitive tourney map, or if you'd rather just do a "fun" tourney map. What's the difference? Well, the biggest visible difference occurs in the layout/item placement area. But there are also hidden differences one can only see during the design/creation stage. This is because the mind set that you need for one type of map verses the other is completely different. So in doing a "serious" tourney map, the whole design process is going to be different from a "fun" tourney map. You will have to constantly test the map with players who know what they are doing, and you will also have to make every decision based on how it will affect the gameplay of your map. "Fun" tourney maps, on the other hand, usually will have a decent layout, but on average, will not have enough depth or complexity to quench the thirsts of the more serious players. These type of maps will also usually focus as much attention on the looks part of it as the gameplay part of the map.
So now that you have correctly chosen the path of the Enlightened (making a competitive tourney map of course!), you will need to design a layout for the map. This step is the single most important part to the map, so much care and thought is needed in the process of the design stage One thing to caution in designing your layout is careless randomness. Although starting out with a "kewl room" and "going with the flow" to create your level might seem like the right thing to do at the time, in the long run it will most likely cripple your map. This is because, unless you're an expert at this stuff, making rooms as you go results in a layout which usually doesn't work very well and lacks the depth and strategy needed in a tourney map. Instead, you should intelligently come up with a design either on paper or in your head. You don't need to necessarily come up with every little detail of the level, but at least get a rough layout of the map going. In the alpha and beta stages you will most likely end up making many small changes to the layout so you don't need to be worrying too much about the first few layout attempts
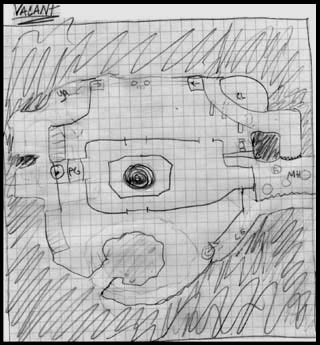
Here is an example of a rough sketch I did for my level wvwq3dm3.
[See Pt. III of this guide for more details on designing your layout.]
This next part is also quite crucial to the design of your map. Once you get that killer layout drawn out, churn out a simple little alpha map for some players to get a hold of. In this first alpha map, you want to get all of that basic layout that you thought/drew out and apply it to 3D brush form. Don't worry about any texturing, detailing, or lighting in this first version. You just want to get the basic "skeleton" worked out. This includes one of the hardest parts for many mappers–getting the scale right. So the main purpose of these earlier map testing projects is for getting a feel of what works and what doesn't. To do this, you'll probably want to enlist the help of a clan or some players from one of the forums I have linked above. If the general consensus of the testers is that the map's layout doesn't have what it takes, suck it in and scrap the map. After all, that's why you're doing an alpha–to see if the layout works. Often, even if the layout isn't all that great to start with, enough changes to it in the early stages of design can improve the gameplay drastically.
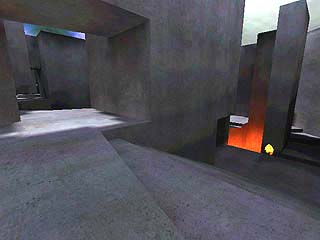
A sample shot from the alpha of my level wvwq3dm6:
This section is going to attempt to go into detail on some of the design theory behind creating good layouts. I will first make some simple definitions in an attempt to give the mapper a clear view on what exactly it is that he is mapping for. I will then go into more detail, describing the different aspects of a good layout. However, this section will not try to give you a quick "easy-as-1-2-3" way to making great maps. Instead, when you understand the basic fundamentals, you will be able to apply what you know to an actual map. Just remember that experience is the best teacher though. You can know all the fundamentals in the world, but experience will still take you that extra step and make it that much easier to create your maps.
[also called: tourney, 1-on-1, DM, match play]A type of play, specifically in the FPS genre of games, in which two and only two players oppose one another with the single goal of "scoring" more "points" than their opponent. They must do this by killing their opponent more often than they themselves are killed.
The function of the level is to create a continually interesting playing field for the players. Without any items at all, a level already presents several new strategies for the players. All of these strategies in and of themselves give the players sufficient reason to traverse the level, if only to gain the tactical edge.
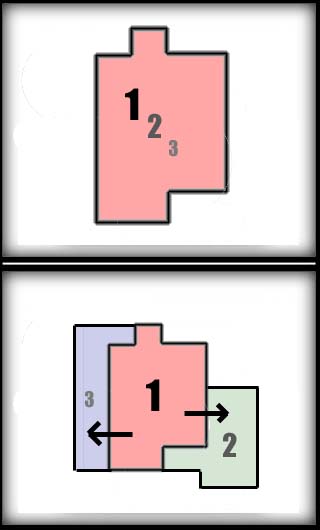
In the first design, the mapper has foolishly decided to put all three levels directly on top of each other. (Silly mapper!) Thus, the only possibly way of adding visible connections between the levels will have to be through the use of holes made in the floor. The second picture shows a better way to layout your tiers. In this method, the mapper offsets the different levels so players can have much more contact with players on other levels than their own.
Symmetry - Please, do not make your levels completely symmetric. This effectively halves the gameplay of the level since there is now only half of the level which is unique. The only reason q3tourney2 can get away with being symmetrical is because it has an asymmetric item placement. Even then, q3tourney2's gameplay is severely limited because of its symmetry.
Dead Ends - Generally, dead ends are a very, very bad thing. :) They abrupt the flow and slow down the gameplay. But every so often the mapper can in fact use a dead end to house an important item. DM4's MH deadend is probably the best example of this. The player has to risk being trapped in the deadend in order to gain an upper hand on his opponent by gaining the MH.

As you can see, the first pic is simply a room connected to another via a simple stairway. Not only does this create a very bad choke point, but it also creates bad connectivity. The second pic shows another possible way, which would provide much more connectivity. There are now 3 possible routes from the lower level to the upper level. One route via jumppad takes you to an even higher level (3), the second route uses a teleporter, and the third route use the stairs method.
Here are some specs to help you out (none of these are "official", just what I have observed):
Over the years, there have been a number of basic layout types that have worked. Just by looking at the major successful 1v1 maps you can already start to categorize them into various groups. Here are some of the most common layouts that have worked:
Note: These are just here for guidance. Don't think for a minute that you HAVE to follow these layouts. Feel free to experiment and find what is best.
One of the best ways to develop a layout is to look at current map layouts that work. This section will specifically analyze three different maps, one from each of the categories above.
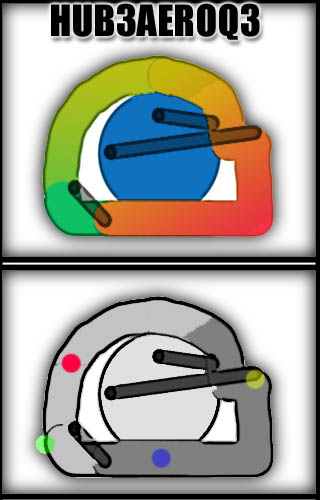
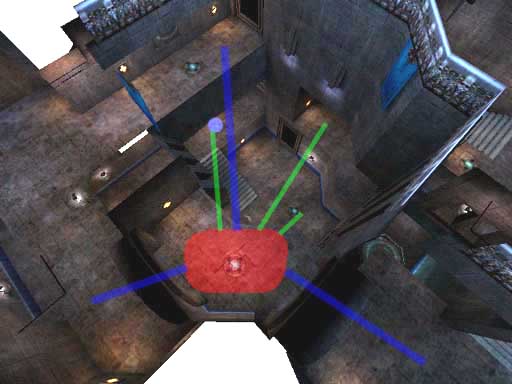
Here is a key control point for the up player. The area in red represents where the player can be to have access to all of these areas. The blue lines represent top level routes and Lines Of Sight (LOS) which the players have immediate access to. The green lines represent drop down routes and LOS's which the player also has access to. Not only does the player have access to all of these, but he also can guard the important RG teleporter, and more importantly the MH area. One disadvantage of this area is that the player can't directly defend the RA area, therefore leaving his opponent open to grab the RA.
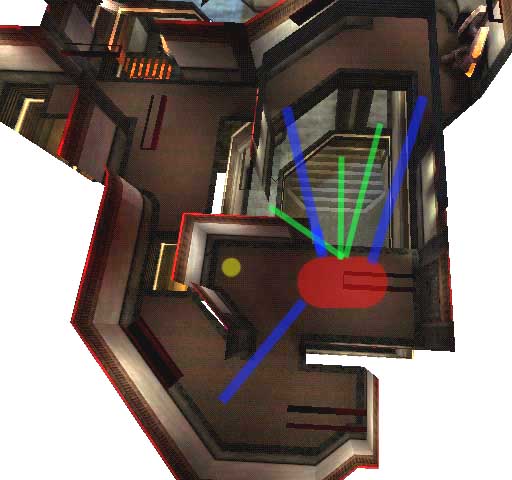
This next pic shows one of the key control areas to the map. The red area is where the player will often be. Here, he will have access to the YA to the left, and the 2 25h's behind him. On the upper level, the player has 3 options to take. These are again represented by the blue lines. The green lines once again represent the LOS areas which the player may keep track of their opponents. With the railgun, this upper player is in one of the best positions due to the multiple routes and multiple LOS's he has access to. Not to mention the teleporter LOS. Probably the only big disadvantage to this position is the difficulty it is getting out of it. The player has to either turn around and go down the dangerous hallway with their opponent potentially waiting for them, or he has to jump into the wide open atrium to get to any of the other areas (blue & green lines). This leaves him open to any kind of attacks that his opponent might launch on him.
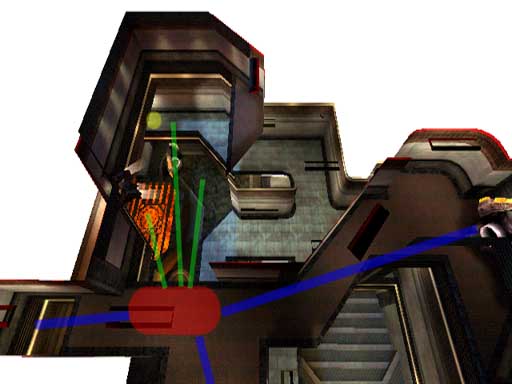
This final pic shows another key control area for the player. Once again there are 3 good upper level escape routes/LOS's (blue lines) and 3 good lower level escape routes/LOS's (green lines). The player also has a LOS's to the full set of reciprocal teleporters, meaning he can fully control them, therefore keeping the player on the bottom level better. For items, the player has access to the mid-level YA and either 50h. But to do this, he must make the dangerous wide open jump across, opening himself up to attacks once again.

Here is one of the primary control points of the map. When the player is anywhere in the red-zone, he has two top level routes/LOS's (blue lines), two mid-level routes/LOS's (green lines), and 2 bottom level routes/LOS's (yellow line). This allows the player to guard all entry points to the MH, therefore allowing him to grab the MH himself. It also allows the player to escape via any number of routes if in conflict. One disadvantage is the jumppad right ahead of the player. This can allow for his opponent to get right in his face very quickly, possibly allowing his opponent to regain control.
In the last section, it was mentioned that items are one of the devices used to complicate gameplay. This section will further go into how to place items in your level–when to put something in, when not to, where to put it, etc. There, of course, isn't any set rules for this kind of thing, but there's plenty of useful previous knowledge which may be applied to your current maps.
We'll start with the most important items of course! Without weapons, play would get boring extremely fast. With Quake 3, id decided to try and balance the weapons as much as possible. Why you ask? Because if any one weapon completely ruled everything else, players would end up only going for that weapon and once they got it, would be able to easily control the map. (see BFG) And on the opposite end of the spectrum, if any one weapon was weaker than everything else by a large margin (besides your spawn weapon), there would be no point in having it. What unfortunately ended up happening though was that the hitscan (mainly the railgun and machine gun) weapons began to rule play. This resulted in gameplay which relied on pure aiming skill as opposed to the skill of the player as a whole. Since then, Promode has fixed this problem with a number of weapon tweaks to the weapons. So now, in Promode the weapons are balanced a little bit better with the RL, LG, and RG being the "terrific three" of the lot.
So where does that leave the mapper? Well, with the weapon set being like it is, the mapper doesn't get many choices. Currently, pretty much 99% of the competitive tourney maps have the following weapons: SG, GL, RL, LG. The RG is also in most maps, but every once in awhile it is excluded. The PG is in every once in awhile it seems, depending on the map. BFG almost never (although that might change with the new CPM changes to it) So there is not really that much question as to WHAT weapons you should put in your map (with the exception of the PG and RG), now just a question of WHERE you should put them.
Utility: The shotgun is a frequently understated weapon which used in the right hands can deal some heavy blows. It is most often useful to the down player because it is a step up from the MG and gives the player something to use until he gets a major weapon. The weapon's effectiveness is directly proportional to the type of map it is–tighter maps mean it is more powerful, larger, more open maps mean it is less effective. Plan accordingly.
Placement: I've noticed that in most maps the SG is placed in a somewhat well frequented area, yet off to the side and not the center of the attention. Also, if you are wanting the down player to be able to grab it quick, make sure there are a few respawns close by.
Amount: Usually 1. Sometimes 2 depending on the map.
Ammo: To give down players even more of an edge, one may include an ammo pack right next to the weapon. Other than that, the SG doesn't usually need all that ammo around the level, if any at all because the players don't often use the SG enough to warrant the need. If you do put ammo in, 1 pack should be enough.
Utility: >Another overlooked weapon, the GL can also be useful to the down player. In close combat, a direct ‘nade to the face can cripple a player's opponent. The weapon may also be used in conjunction with other weapons to confuse the player into either stepping onto a grenade or walking into the line of fire of another weapon. Third, grenades can be very useful to block off different areas temporarily or to spam lower levels when you know the player is below. Overall, the GL adds a lot of depth to a level. It provides for more interesting fights (although it can slow down play sometimes), therefore it is almost always good to have a GL in.
Placement: Two schools of thought on this: Place it high and encourage spamming, or place it low to discourage spamming. Both are actually valid techniques, but it really depends on the map and what the mapper is wanting to do with it. Just know the consequences of the placement ahead of time.
Amount: Almost always one.
Ammo: >Really doesn't need any usually. However, if it's a rather large level or you are wanting to produce spamming, then include a pack of ammo.
Utility: Ah, the mighty Rocket Launcher! With Promode's changes to its velocity and damage, it is now the major weapon to have. Its vast possibilities for use is one of the reasons why it is so popular. Players can use it in close battles to bounce their opponents around, mid-range battles by predicting where their opponent is going to be and usually hitting them with splash damage via walls or ceilings, and long range to protect certain doorways or spam various areas. It also, of course, allows the player much more vertical mobility with the rocket jump.
Placement: Most often, the RL will end up being not only a highly used weapon, but also a spamming weapon. Because of this, it is usually good to place any RL's in the map in the more frequented areas. Place them in central locations making the player expose himself to get it. If you decide to have two RL's in your map (which is usually a good idea) you will most likely want to spread them apart in opposite atriums and likely on different floors.
Amount: 1 or 2. It seems as if more and more maps are sporting 2 RL's as this allows for more rocket spamming and lets each player grab an RL, making it a somewhat standard weapon when dueling.
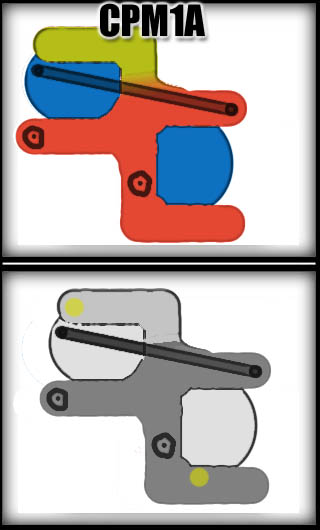
Ammo: If you are wanting to encourage spamming, you'll want a few ammo packs in your map also. With 2 RL's, not as many packs are needed, but it might work to put an ammo pack next to one of the RL's (CPM1A does this). This makes the one RL more important to control than the other. Overall, 2 or 3 ammo packs is usually good for the RL.
Utility: Provides excellent short to mid-range offensive capabilities. Due to its fast (somewhat) hitscan nature, it is often used in combos or to finish off the opponent. The weapon is usually the most effective in smaller single or duel atrium style maps where long range battles don't come into play as much.
Placement: From what I've noticed on maps, the weapon is usually placed in a "sub-area" or side room off the main area. This area is frequented every so often, although not continually. So why does this type of location usually work for the LG? I think its because the LG is more of a specialized weapon, and something that needs to be sought after to get. Its usually in a side area because this creates just enough danger (but not too much danger) to allow the players to grab the weapon, yet still make for interesting battles over it.
Amount: Definitely only 1 is needed.
Ammo: Usually, the mapper wants to make the ammo somewhat scarce in order to limit the weapon somewhat. Sometimes there is an ammo pack a hop, skip, and a step away to allow the player a little more long lasting flavor with the weapon. Only do this if you don't think the LG is powerful enough as is, and needs a bit of extra ammo to keep up with the other weapons. Otherwise, just place 2 or 3 ammo packs around the map in order to make the player have to move around to stay loaded.
Utility: Covers the long-range combat aspect quite well. Also may be used in combos to finish off enemies. Acts as a great spawn-raper in Promode unfortunately (or fortunately depending on who you are) Can be over-powering in more open maps, so its inclusion is not always a good idea.
Placement: By default, the RG is a very dangerous weapon. Therefore it needs to be in a somewhat dangerous location. Either place it in the open, making players have to expose themselves, or place it in a dangerous area like a small dead-end or 2-door area. For example, CPM1A's RG placement is perfect because it makes the player very susceptible to an attack from his opponent, and initially renders the weapon not as effective since it is on the lowest level. Careful when thinking about putting it at a top level, as this might encourage unneeded sniping.
Amount: If you do decide to include the railgun, never include more than one.
Ammo: Almost always none. Every once in awhile 1 pack which is dangerous to grab.
Utility: This weapon does decent to good in every area of combat (short to long range), yet it doesn't excel in any. This may be the reason why it is often left out–another weapon can do its job. At close range, the PG can eat away at a players health faster than any other weapon. At medium to long range, the weapon usually serves as more of a defensive weapon through the use of spam. It also is the anti-railgun as it can confuse the player with the RG when his opponent is shooting a bunch of projectiles at him.
Placement: May usually be placed in a similar manner to the LG. Often it serves as more of a down player weapon, so it may also be placed in an easy to get spot, yet out of the way.
Amount: No more than 1 if any.
Ammo: Usually only 1 or 2 packs. If you are wanting more spamming with the PG, for example if the RG is becoming too dominant, give the player more ammo.
The BFG has no place in the serious vQ3 tourney map. It reduces all strategy into a simple "Whoever has the BFG wins" type play.However recently, Promode has made some big changes to the way the BFG works. With these changes, the BFG now acts as a slightly faster, slightly more powerful RL. While with these changes, a level might actually work now with the BFG, I would still have to say to leave it out. It's a bit late in the ballgame to be adding a "new" weapon to the weapon set, and I seriously doubt players would accept the map for tournaments or in leagues because of the BFG–no matter how well it works in the map. (edit: It seems I must eat my words in regards to the BFG since it is now being used competitively in the form of CPM16)
I know, I've already gone over this in the weapons section. But here are just a few general rules to follow:
Not usually a huge issue in item placement, yet health placement still has some certain guidelines to follow:
Armor is one of the most important items to control in a level, so much care is needed in adding armor to your level. The armor you choose and its placement in the level can dramatically affect your level's gameplay: such as the importance of different areas, the paths players will take, and the balance and controllability of the map.
A few guidelines regarding the placement of armors:
There are quite a few combinations of armors one can have in a level. Here are a few of them:
These items (quad, enviro, regen, invis, haste, flight, medkit, and personal tele) absolutely have NO place in a competitive tourney map. Why you ask? Powerups don't belong in a level because they are all based on a certain amount of time that they are effective. Because of this, whenever a player has a powerup, his opponent simply can run and hide until the powerup is gone, therefore slowing up the game immensely. The medkit isn't good because its annoying to have your opponent use it right as you're about to kill him. The Personal Teleporter isn't good because it makes the game too gimmicky–you'd never know if your opponent is about to disappear.
These items are often overlooked and just randomly placed in areas, but they can actually serve some quite useful purposes.
 © cpma-news.org 2011-2026